Watch this video to see how you can set up your Steemit account to automatically share blog posts to your Facebook account. This will really help you grow your Steemit blog, which will enable you to start earning more Steem Dollars. You’ll gain more exposure by sharing to Facebook. In addition, it will also help your Facebook account grow by regularly sharing your Steemit content!
The best part is that you can set this up to run all on its own. You won’t have to manually paste links or share content. It will be done completely on autopilot using a cool platform called If This Then That or IFTTT. Therefore, if you don’t have an IFTTT account then check out this post on how to create an IFTTT account.
Once you have your account, watch this video. If videos aren’t your thing, then check out the transcript below to read all about how to automatically share your Steemit posts to Facebook using If This Then That.
One important thing to note is that the method in this video uses Streemian RSS feeds. However, unfortunately, Streemian RSS has been discontinued. Therefore, here is the RSS URL you will have to use.
Hey guys Spencer Coffman here, today I’m gonna show you how you can automatically share your posts from your Steemit blog to Facebook. That means any time you make a Steemit blog post you can tell everyone on your Facebook page or profile that you have made that post on Steemit.
They will, hopefully, go over there and read it, upvote it, maybe even Resteem it, and put a comment in there for you, which will ultimately help you get more monetary rewards, steam dollars, etc.
To get started, you need to make sure you have three things. Number one is, obviously, a Facebook account. Number two is, obviously, a Steemit account. And number three is this cool account on a website called IFTTT, which stands for If This Then That.
This is an excellent site that you can use to connect everything together and have something happen based on something else. To create a new account go ahead and check out my video on how you can create an if this then that account and you’ll be good to go. It’s really easy.
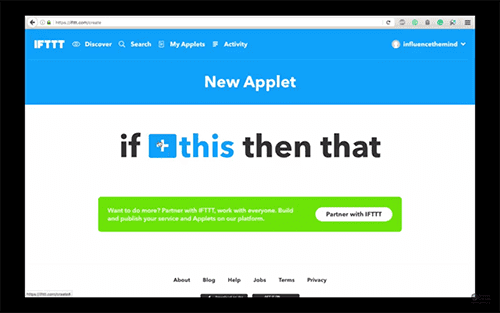
Once you’re here, you’re gonna go to a place called ‘my applets’ and you’ll see here the applets I have available. Then you are going to click on ‘new applet’. Now, this is kind of confusing because it would seem that you’re gonna click on the button or banner down here.
However, you are not. So do not click that. Instead, you want to click on the ‘this’ section. So you’re gonna have ‘this’ as your trigger. Click on that, and we are gonna choose an RSS feed for our trigger because the Steemit posts are basically your own blog, your own website, so it has an RSS feed attached to it. So we’re gonna click on that.
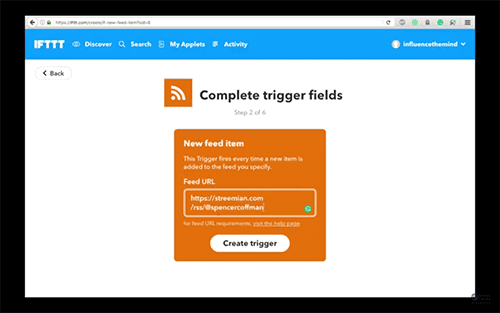
You’ll see here ‘new feed item’ and ‘new feed item matches’. We want ‘new feed item’ because it will trigger, or fire, every single time a new post is made to your feed.
Now, your feed URL is going to be HTTP colon slash slash streemian dot com slash RSS at your username. Okay, so, I will post this in the description below.
You can copy and paste it and use it in there, just make sure to change the username to your Steemit username. Otherwise, you’ll end up sharing my content to your Facebook, which is fine I’d really appreciate it if you do that as well.
However, you probably want, or are more interested in, sharing your content. So make sure to switch out that username with your Steemit username.

This is also very important you want to use streemian dot com not Steemit dot com because streemian dot com is the blog feed and to show you that, we are going to open up a new tab here.
I’ll paste it in and you will see here’s my feed. So again, feel free to follow me on Steemit @SpencerCoffman. I’ll put that link down there below in the video description to prove to you that you want streemian and not Steemit. We’ll go there. steemit dot com RSS and you see we end up with a page not found.
So make sure to copy and paste from the description below or type streemian, not Steemit. Because if you type Steemit you’re gonna have problems.
Anyway, once you have that in there, click on ‘create trigger’. Okay, now you’ll see that we have the ‘if RSS feed’ then ‘that’. So we’re going to click ‘that’ and now we want ‘Facebook’. So we’re gonna click over here on ‘Facebook’ and it says ‘create a status message’.
This action will create a new plaintext link post or URL. ‘Photo’ so this will upload a photo from the given URL to a Facebook album you specify.
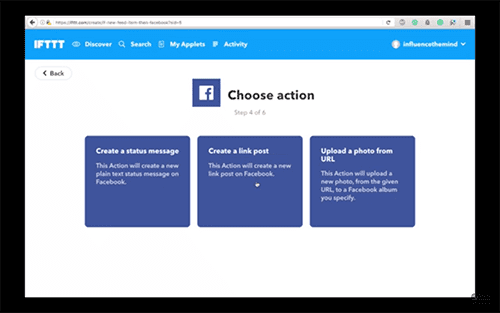
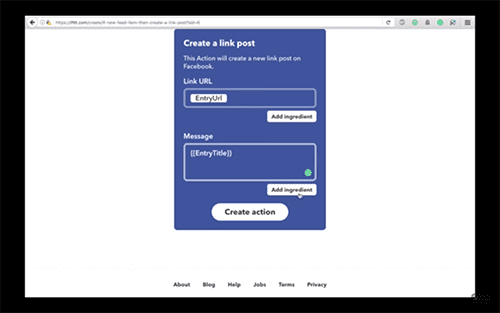
You can choose whichever one you want. I will choose ‘create a link post’ and it says: ‘this action will create a new link post’. Link URL, entry URL, and message. We can add ingredients in either one.
So I’m gonna add it here the entry title so the message will be the entry title. Then hit ‘create action’. Now it says the summary is ‘if a new feed item from my RSS feed then create a link post on my timeline’. Receive the new notification when it runs. I’m going to leave that on and hit finish.
And there it is. We’ve made a new applet. That is it. That is how to automatically have your Steemit blog posts share on your Facebook Timeline. Go ahead and click on the links in the description below to get this set up.
If you have any questions, if you get stuck anywhere, have any comments, please post them in the comments section below. Also, be sure to share this video with those you know. Post it on Steemit and see what happens. Maybe you’ll get some curation rewards.
In addition, I’d appreciate it if you’d follow me on Steemit and subscribe to this channel to be updated on future posts. Click that little bell icon down there to get notified.
Until next time.

